|
•
Jet's Dutch Tutorials
Jet's Original Tutorial here in Dutch
SUPPLIES  Download here PLUGINS/FILTERS FM Tile Tools Xero - Porcelain Penta.com - VTR 2 Virtual Painter 4 
Use this pencil to show
you where you are in the tutorial.
Just left click on it and drag it to where you want it to go. The pencil will stay in position until you close your browser. Drag and Drop Script: © Dynamic Drive (http://www.dynamicdrive.com)
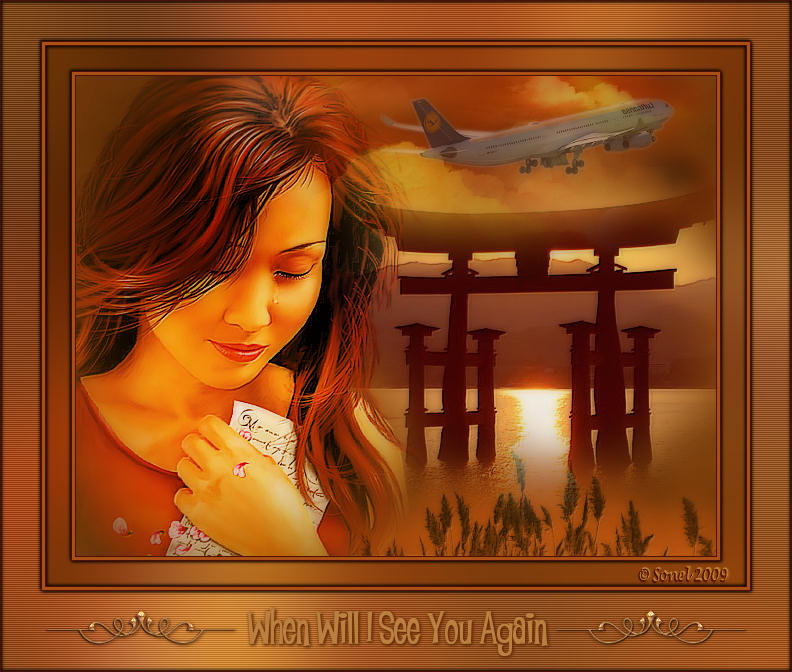
LET'S START! (Remember to save often) Open : Cloud-when.psp This will be our working canvas Copy : KaraT1040.psp Paste as New Layer on your working image Position at the top Set the Opacity to : 48 Effects - Plugins : FM Tile Tools - Blend Emboss, standard settings Duplicate the Layer Effects - Plugins - Virtual Painter 4 : Airbrush You will see that the image moved a bit - just move it back over the image below Set the Blend Mode to : Hard Light and the Opacity to : 26 Copy : KaraT3775.psp Paste as New Layer on your working image Position a little bit to the right (see example on top) Effects - Plugins : FM Tile Tools - Blend Emboss, standard settings Open the tube : KaraT661.psp Adjust - Hue and Saturation : Hue : 18 Saturation : 227 Copy and Paste as New Layer Set the Opacity to : 57 Move it to the right and a little bit down until you can only see the top of the sprit blades Effects - Plugins : FM Tile Tools - Blend Emboss, standard settings Copy : KaraM16.psp Paste as New Layer Image : Mirror Image - Resize 5x : 80% Bicubic - Resize all layers NOT ticked! Position in the right corner and set the Opacity to : 55 Open the tube : SKF_WomenCry183[1].07.pspimage Layers - Load/Save Mask - Load Mask from Disk : 20/20.msk, with the following settings:  Layers - Merge - Merge Group Copy and Paste as New Layer on your working image Position her to the left Set the Blend Mode to : Hard Light Effects - Plugins : FM Tile Tools - Blend Emboss, standard settings Layers - Merge - Merge Visible Effects - Plugins - Xero : Porcelain, with the following settings: 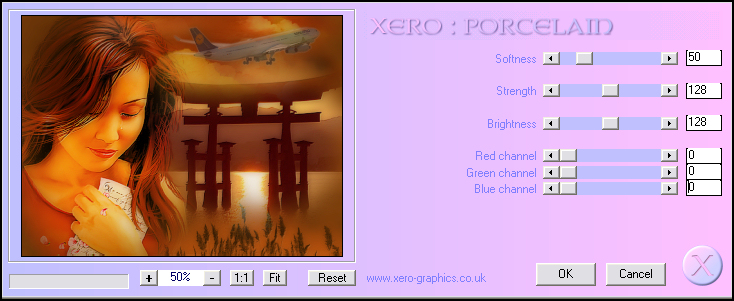 You can leave it at the standard settings if you like also. Image - Copy and Paste as New Image - Minimize Image - Add Borders :1 pixel #4c1005 Image - Add Borders: 3 pixels #aa5016 Image - Add Borders : 1 pixel #4c1005 Image - Add Borders : 25 pixels White Select the White Border with the Magic Wand, Anti-alias ticked, Inside Edit - Paste into Selection Adjust - Blur - Gaussian Blur : 50 Effects - 3D Effects - Cutout : 1, 1, 100, 5 - Shadow Color : Black Repeat with : -1, -1, 100, 5 Selections - Select None Image - Add Borders : 1 pixel #4c1005 Image - Add Borders : 3 pixels #aa5016 Image - Add Borders : 1 pixel #4c1005 Image - Add Borders - Symmetric NOT ticked, with the following settings: Top, Left and Right : 40 pixels Bottom : 80 pixels Color : White Select the Border with the Magic Wand Edit - Paste into Selection (the previous image you copied) Adjust - Blur - Gaussian Blur : 50 Effects - Plugins - Penta.com : VTR2 with standard settings Effects - 3D Effects - Cutout : 1, 1, 100, 5 Black Repeat : -1, -1, 100, 5 Selections - Select None Image - Add Borders : 1 pixel #4c1005 Copy the text : when-tekst.psp and Paste as New Layer Move it down to the bottom border of your image Effects - 3D Effects - Drop Shadow : 1, 1, 100, 5 - Color : #632c06 Layers - Duplicate Layers - Merge - Merge down Copy : div8.psp and Paste as New Layer Image - Resize : 80% Bicubic - Resize all layers NOT ticked Position it down next to the text Effects - 3D Effects - Drop Shadow : 1, 1, 100, 5 - Color : #632c06 Layers - Duplicate - Image - Mirror Place your watermark and name Layers - Merge - Merge All (Flatten) TERMS OF USE
•
|